When you first run the WS_FTP program, you will see this basic startup screen (without the red
square - that's my doing):
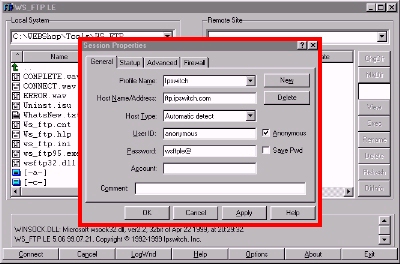
I've highlighted the important part of this screen you need to worry about first. So, let's just look at that a little closer: Notice the five places I've circled in blue. I'll work through them from top to bottom (left to right).
|
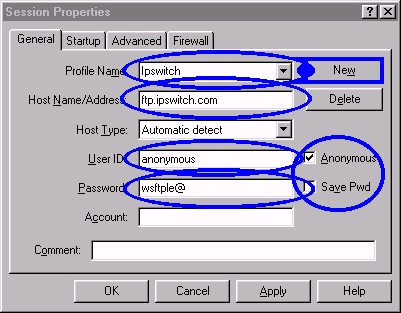
- First, there's a circled window that has Ipswitch in it, and also notice that
the NEW button is blue-highlighted. You want to create a new profile, so press that NEW
button.
Let me warn you that, ideally, you should install (copy) the WS_FTP folder to your computer's hard drive. That way, this program can SAVE your profile and you won't have to go through this every time. It's just that if you run the program directly from the CD you can't save (you cannot write to the CD).
As soon as you press the NEW button, things change (almost all the windows blank-out).
Now, type in something to identify the profile (I simply use RMU). If nothing happens when you type, you may need to click on that top empty window first.
- Next, use the mouse to click on the window to the right of Host
Name/Address: and then type in the following EXACTLY:
academics.rmu.edu
- Third, click on the empty window to the right of
User ID: and then type in your user name (the one you'd use if you
were logging on to check email).
- Fourth, type your email-account password into the appropriate window.
- The fifth and final step is actually optional. If you have saved the program to your hard
drive, then it might be handy to click on the little box that says Save
PWD. This will speed your use of the program, however, it does so at the possible
security risk of making it easy for others to access areas of your account. Obviously the
choice is yours. If security is a concern at all, DO NOT CLICK on that box.
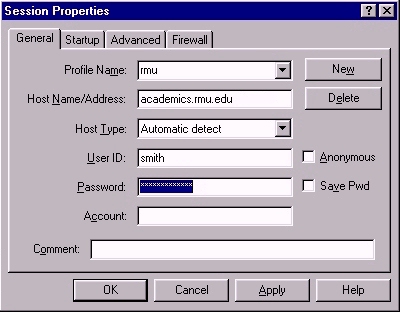
Now the window should look something like this one (of course YOUR email name would be used instead of SMITH, etc.)
The program will show you two windows. The one on the left should show you what is on your computer (local system). You can navigate around here to find the subdirectory and files that you would like to transfer to the Robert Morris server. The window on the right should show you what is in your Robert Morris web account (remote site). The first time there you shouldn't find any files.
In the left window, click once on the file you would like to transfer to the right window (i.e., the file you want to upload to the server). If it is an HTML file, make sure that the button labeled ASCII is filled, otherwise, make sure that the BINARY button is filled in.
-
(If you aren't SURE which button should be filled in for a particular file, it is better to
err by calling it binary than calling it ascii. The worst that will happen is that if you
try to look at a text file (e.g., an HTML file) that was transferred using the binary format,
you'll lose your line breaks. It will most likely look fine as a web page. On the other hand,
if you transfer a non-text file (e.g., an ms-word document or a picture) using the ASCII
format, it will be turned into garbage.)
Once you've selected the file(s) you want to transfer, press the right-arrow button that is centered between the local and remote windows. (The process is virtually identical going the other way.) After some churning and what-not, the program will update the window to show you what files have been added (or subtracted, should you use the delete button).
Note: To select multiple files, hold the control key down and select (click once upon) each file you want to tranfer. If you click once on a file, then hold the shift key and click on a new file either two or more locations above/below the first file, all files between the two will be automatically selected.
- As I noted earlier, if you set up the FTP program to automatically remember your password,
that will make it possible for someone else to access the files on your account (assuming that
they have somehow gained access to your computer).
- A second issue has to do with the default web page that browsers search for when they
access a site. If you literally type a web address into the navigation window of any
web-browser, it will take you to the html page you specified. However, what if you typed in
the whole address EXCEPT for the file name? For example:
http://academics.rmu.edu/~smith/The web browser will go to that location, and then first search for any file called INDEX.HTML or INDEX.HTM (there are other varients, such as DEFAULT.HTML, but these are likely to be determined by your hosting service and they would tell you). If it finds one of those files, then that file is what will be displayed. In other words, the above address would be the same as if you had typed this address:
http://academics.rmu.edu/~smith/index.htmlIf the browser CAN'T find an INDEX file, it will display a directory list of the contents of your on-line web folder. This gives people a great view of what files you have available. So obviously, if you upload sensitive files, others will have easy access to them if you do not have a main "face" page called INDEX.HTML (or INDEX.HTM).